Now that I have got a SUP (Stand Up Paddleboard), I wanted to make my own paddle. Good carbon paddles cost around $300.00 and I knew that with my experience working with epoxy, fiberglass, carbon fiber and other composite materials, that I could make my own. Plus, several windsurfing friends of mine made their own beautiful carbon paddles so I wanted to give it a try.
Since I did not want to spend a lot of money on a carbon shaft on my first "test" SUP paddle, and did not have ready access where I currently live to thin foam sheets to make the blade from, I decided to just make it with a lightweight wood core. Plus I decided to just use scrap pieces of carbon, kevlar, and fiberglass cloth I have remaining from previous projects.
I knew the end result would be heavier than a foam core carbon blade and shaft paddle but I felt confident I could build one that would still be light enough to be good for paddling until I have time to build my next all carbon paddle.
To begin I made a template for the paddle blade based on the general shape and size of most commercially available paddles. I then transferred that to a piece of 4mm (3/16") thickness plywood.

4mm plywood
Then I applied a single layer of 4 ounce bi-directional E glass to both sides of the blade and then began to work on the shaft. (No photos of this step.)
For the shaft I found a lightweight wood dowel about 6' long and about 1 1/8" diameter which seemed about right.
The photos now follow the process.
 4mm plywood used to make 12 degree paddle shaft cutting jig.
  Another view of the 12 degree jig.
  After making a plywood jig to allow me to cut the paddle shaft at the desired 12 degree angle, I used my favorite Japanese razor saw to cut the shaft following the angle on the jig.
 The shaft now cut at 12 degrees
.
 Jury rigged jig to hold down the cut paddle shaft to allow epoxying to the paddle blade at the proper 12 degree angle. I used a mixture of epoxy and West Systems 406 Collodial Silica filler to make a very strong glue joint
.
 Side view of the shaft to blade hold down jig.
 Blade now epoxied to the shaft at 12 degree angle
.
 Epoxying on plywood shaft doubler behind the end point of the blade to allow extra strength once reinforced with carbon fiber and glass at the critical blade to shaft joint.
 West Systems Microlight Filler # 410 used to fill in voids and depressions in the shaft to blade epoxy joint. Too be sanded smooth after hardening.
  Shaft and blade now ready for carbon reinforcement.
 Uni-Directional Carbon Fiber cloth alongside shaft and paddle blade and ready for epoxying to the paddle. Uni-Directional cloth will give superior strength to paddle to resist excessive bending at the shaft to paddle joint as well as additional overall paddle strength.
 Uni-directional carbon applied along mid- axis of paddle blade and shaft and then reinforced with pieces of 5.7 ounce/sq yard bi-directional carbon cloth. Also you can see the application of "peel ply" dacron cloth over the layup. This will peel right off when the expoxy has hardended leaving a much smoother surface, compression down smoothly the carbon cloth end fibers, and resulting in much less sanding and filling needed latter.
(Note: When I make the next all carbon paddle I will use a single ply of uni such as shown above and then additional plys of 5.7 bi-directional cloth to completely cover the top and bottom surfaces of the blade and extending up the paddle shaft a short distance to provide additional strength, torsion and bending resistance. I will not need to use 4 ounce E-glass on the paddle blade then since the carbon cloth will be plenty strong.)
The opposite side of the blade and shaft getting the uni-directional carbon and bi-directional reinforcement. Also, note the use of the "peel ply" again.

Too provide increased ding and damage resistance to the paddle blade edges I decided to add a layer or 2.5 ounce / sq. yard kevlar cloth. I cut it on the "Bias" (45 degrees to the fiber orientation) so that it would much more easily stretch tightly around the edge of the blade as well as follow the curve of the blade.
 Kevlar cloth now applied to one side of the blade and ready to be wet out with resin on the edge and opposite side.
 View of kevlar cloth edge strip now completely wet out on both sides of the paddle.
 Edge view of the paddle with the wet out kevlar cloth.
 Now adding additional layer of 4 ounce glass over the paddle blade and kevlar cloth. Note: After doing this step it was apparent that the underlying kevlar cloth created a ridge depression in the overlaying fiberglass all around where the edge of the kevlar met the glass. This would require some filler later. Lesson learned: Add kevlar first to paddle shaft then add carbon cloth plys over it.
  Side view of paddle shaft to blade joint after applicaton of carbon reinforcement and West System 410 Microlight Filler, and subsequent dry and wet sanding.
View of blade after filling with microlight filler and dry/wet sanding smooth.

T-Handle made out of piece of cut off shaft wood dowel and epoxied onto shaft with mixture of resin and Collodial Silica filler.

Another view of the paddle after application of microlight filler and dry/wet sanding.

Just another view

View of completed paddle dry and wet sanded and ready for primer paint.
Note: I used a layer of 4 ounce bi-directional E-Glass in a single wrap around the entire length of the paddle shaft to give it additional strength and stiffness. The wood alone was too bendy and would be prone to breaking otherwise. Once I make the all carbon paddle with a carbon shaft, of course this step will be unnecessary.
Paddle blade and lower shaft with auto-primer paint to fill in small voids. Will be wet sanded with 220 grit wet paper after drying.

Completed paddle after painting.
Note: Years of work and familiarity with composite hang glider and knowledge of composite construction of sailplanes makes me very hesitant to leave any epoxy and/or carbon surface unpainted. This is because UV and sunlight in general can weaken the epoxy composite matrix over time and if left in the sun cause enough heat build up to actually soften the resin matrix enough to cause warping. 
Side view of paddle blade with addition of black plastic edge guard glued onto the paddle to further protect both paddle and board from dings.
Also note the use of SOLAS (Safety of Life At Sea) reflective tape. Could be used for helping to signal rescue craft in an emergency.
Just another view of the finished paddle blade.

View of complete paddle ready to go.
Next I will post some photos of the paddle getting its first real water tests.
 The area in front of the "Surf Club Windekind" clearly marked for windsurfers, and kiters too. No swimming allowed, supposedly but then again, this is Belgium.
 Heading out onto the North Sea. Waves 1- 1.5 meters.
 Looking North down the beach towards the swimming areas
 Looking Southwest down towards the English Channel
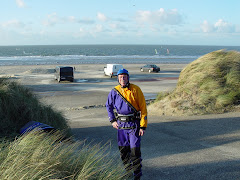
 Chuck smiling after a great session! Still plenty of sunlight to head back out for another though.
 Kiters as far as the eye can see to the South
 View of the entrance to the beach by the "Surf Club Windekind"
 Looking North up the beach.
  From the beach looking east up at the Surf Club and some of the condo's behind. The Surf Club has storage lockers for members windsurfing, kitesurfing and surfing gear. Definitely a great option if you are going to sail at the same place most of the time.
 Surf Club Windekind members and friends watching the action.
 Valeri on his way back out to his board and rig for yet another session.
 Definitely not summer but cold winter day from early December 2008


